Mastering the Procreate Brush Heart Devil Valentines Set for Professional Results
Digital illustration has evolved from a niche hobby into a primary workflow for designers, marketers, and independent creators. Within this ecosystem, the Procreate Brush Heart Devil Valentines collection stands out as a specialized toolset designed to bridge the gap between quick doodling and polished graphic design. However, possessing a high-quality brush set is only half the battle. Many users download these assets expecting instant mastery, only to find their results look cluttered, inconsistent, or amateurish. This often stems not from a lack of talent, but from a misunderstanding of how stamp brushes function within the Procreate environment.
To truly leverage this asset, you must move beyond simple placement and understand the mechanics of digital stamping. This guide addresses common pitfalls users encounter when working with alphabet stamps, numbers, and decorative doodles, offering practical corrections to elevate your workflow.
Understanding the Asset Structure
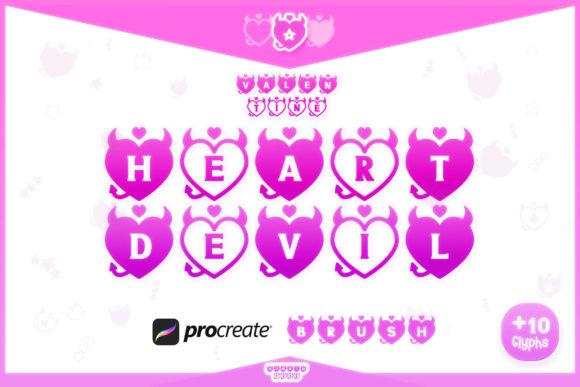
Before diving into creation, it is crucial to recognize what you are actually working with. The Procreate Brush Heart Devil Valentines package is not a single tool but a comprehensive suite contained within one zipped file. Upon installation, you gain access to:
- 26 Alphabet brush stamps in Style 1: Typically featuring a distinct aesthetic suited for bold statements.
- 26 Alphabet brush stamps in Style 2: Offering an alternative visual weight or texture for variety.
- Numbers 0-9 in two styles: Essential for pricing, dates, or list-based designs.
- Decorative doodles: Thematic elements that complement the typography.
It is also important to note that while these brushes are optimized for Procreate, the creator, Numnim, offers Font and SVG versions on the Numnim Type Store. Understanding this distinction is vital. Brushes are raster-based and best for organic, textured looks, while fonts and SVGs are vector-based, ideal for scalable print materials. Confusing these use cases is the first mistake many beginners make.
Mistake 1: Ignoring Canvas Resolution and DPI
A frequent error among beginners is creating a canvas at default settings, which are often too low for high-quality output. When you use stamp brushes like those in the Procreate Brush Heart Devil Valentines set, the resolution of your canvas directly impacts the crispness of the stamp edges. If your canvas is set to 72 DPI (dots per inch), your letters may appear pixelated or blurry, especially if you plan to print your work or display it on high-resolution screens.
The Correction: Always start with a canvas size that matches your final output intent. For social media, 300 DPI is still recommended to ensure sharpness on retina displays. For print, 300 DPI at the actual print size is non-negotiable. By setting this up correctly before you place your first heart or letter, you avoid the frustration of having to recreate your artwork because the quality degraded during export.
Mistake 2: Treating Stamps Like Standard Text
Many users approach alphabet stamps as if they were typing in a word processor. They place each letter individually without considering spacing, alignment, or flow. This results in disjointed compositions where the kerning (space between characters) feels awkward and unnatural. Because these are brushes, not fonts, Procreate will not automatically adjust the spacing for you.
The Better Approach: Treat each letter as a graphic element. Use the Transform tool frequently. After placing a letter, lower the opacity of the layer temporarily to sketch out the baseline or guide lines for your word. Place each subsequent letter with manual attention to the negative space between them. This manual kerning allows for a more dynamic, hand-crafted look that automated fonts cannot replicate. It takes slightly longer, but the professional polish it adds is immeasurable.
Mistake 3: Overusing Decorative Elements
The doodle section of the Procreate Brush Heart Devil Valentines set is enticing. It is easy to fall into the trap of decorating every empty space with hearts, devils, or flourishes. This leads to visual noise, where the viewer’s eye does not know where to focus. In design, less is often more. Cluttered compositions can dilute the message and make the artwork feel chaotic rather than celebratory.
Practical Advice: Establish a hierarchy. Decide what the focal point of your piece is—usually the main text or central image. Use the doodles sparingly to frame this focal point or to balance the composition, not to fill voids. Try the "squint test": squint at your screen. If the decorative elements compete with the main subject, remove some. Group your doodles on separate layers so you can toggle their visibility on and off to judge their impact objectively.
Mistake 4: Neglecting Layer Organization
When working with 26 letters, numbers, and multiple doodle options, your layer stack can become unmanageable quickly. A common oversight is leaving every stamp on its own unnamed layer. This makes editing a nightmare. If you need to change the color of all the letters in Style 1, you might have to select dozens of layers individually.
The Solution: Adopt a disciplined layering strategy from the start. Create folder groups for different elements. For example, create a folder named "Text - Style 1" and place all corresponding letter layers inside. Do the same for "Doodles" and "Background." Use clipping masks effectively. If you want to change the color of a specific letter, clip a new layer above it and fill it with color, rather than redrawing the stamp. This non-destructive workflow saves hours of revision time.
Mistake 5: Failing to Customize Brush Settings
While these are stamp brushes, they still retain some adjustable properties in Procreate. Users often accept the default size and opacity without experimentation. However, varying the opacity can create depth, making some elements recede while others pop. Similarly, slightly rotating individual stamps can add a playful, organic feel that rigid horizontal alignment lacks.
How to Improve: Experiment with the brush settings. Adjust the size dynamics if you want variation without manually resizing every stamp. Play with the opacity slider to create subtle background textures using the doodles. Remember, the goal is to make the digital tools feel hand-applied. Small imperfections and variations in size and rotation contribute to this authenticity.
Pre-Purchase and Pre-Use Checklist
Before you begin your next project with the Procreate Brush Heart Devil Valentines, run through this quick checklist to ensure success:
- Check Compatibility: Ensure your version of Procreate is up to date to support the latest brush engine features.
- Define Your Output: Are you designing for Instagram or a printed card? Set your canvas DPI accordingly.
- Plan Your Palette: Choose a limited color palette before you start. These brushes work best when colors are cohesive, not random.
- Review the License: Understand how you can use these assets. While great for personal and commercial projects, always verify the specific terms provided by Numnim Type Store, especially if you are selling the final design.
- Backup Your Work: Save your Procreate file frequently and consider exporting a PSD version if you need to edit in other software later.
By avoiding these common pitfalls and approaching the Procreate Brush Heart Devil Valentines set with a strategic mindset, you transform a simple collection of stamps into a powerful design system. The difference between an amateur doodle and a professional graphic often lies not in the tools used, but in the discipline applied to them. Take the time to organize, plan, and refine, and your Valentine’s creations will stand out for their clarity, charm, and quality.